Validation – Adjustment of NIR Calibrations
When starting to use a new NIR calibration it’s good practice to validate and adjust it. Especially if it was developed using a different reference lab than the one it will be compared to in routine use.
Unfortunately, different labs don’t give identical answers when analyzing the same samples, even when they use exactly the same methods, so to have your NIR instrument match your reference lab you need to perform a validation. It’s also good practice to re-validate your NIR instrument against your reference lab on a regular basis.
According to the International Standard ISO/FDIS 12099 at least 10 samples are needed for determination of bias and at least 20 samples are needed for determination of the calibration performance, expressed as the Standard Error of Prediction (SEP). PerkinElmer’s general recommendation is to use at least 30 samples as it provides the chance to investigate calibration performance in case there are any question marks.
Selecting samples to use
Select samples which cover the range you expect to encounter in routine use, for each of the parameters you will measure. Compare with the range officially covered by the respective calibration as it is only intended to be used for samples within that range. The samples should be evenly distributed over the range.
Also, consider variations in:
- Ingredients. Variations in grade, type or geographic origin may need to be included.
- Your production process. Have there been any changes to recipes, processing conditions, machinery etc?
Analyzing samples
First, make sure that the wet chemistry method used by your reference lab is the same as the one the calibration was developed against. In some cases, different wet chemistry methods correlate very well with each other and give comparable results. One example is protein determination by Kjeldahl and by Dumas, which in many cases correlate very well with each other. In many other cases though, different methods don’t correlate and can’t be interchanged.
Secondly, pay attention to which moisture basis constituents are reported on. For example, is protein reported as % of the total weight including moisture, or is it reported as % of dry weight. This significantly impacts results and for adjustment you need to use the same moisture basis for NIR and for reference methods. If you will be comparing the NIR to the same lab it was calibrated against, this will probably not be an issue but should still be verified. If you are comparing to a different lab than the calibration was developed against, then you need to consider this carefully. You can easily recalculate results between different moisture bases, so it’s fine to have different moisture bases as long as you recalculate values.
It is recommended to analyze the exact same sample on the NIR instrument and by the reference methods. Very few sample types are completely homogenous and there are differences between different sub-portions of a sample. If you need to take out a portion of a sample, make sure you mix sample properly first.
Label each sample with a unique ID. It is very important that the same ID is used during NIR measurements and reference analysis so you can match up the results.
Minimize the time between NIR and reference analysis to reduce the risk that the samples change. The moisture content changes very rapidly and samples should be vacuum packed or stored in airtight containers in an environment where they will not degrade. Regular plastic bags are not sufficient for storage.
To minimize errors samples should be measured in duplicate, both by NIR and by the reference methods.
Evaluating results and calculating adjustments
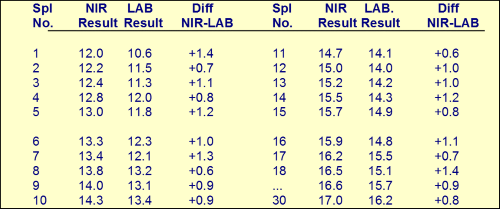
When you have the results of all analyses, you need to evaluate results and calculate adjustments. In many cases the easiest way to do this is to enter results into a spreadsheet, with one sample per row and one column each for NIR results, reference method results and the difference between the two. Basically, you simply calculate the average difference between NIR and reference method values, and adjust the calibration correspondingly if there is a difference.
It is highly recommended to also plot results in a so-called scatter plot, where each point represents one sample and the axes are for the NIR values and reference method values respectively. If there is an average difference between NIR and reference method, such a plot might look like this.
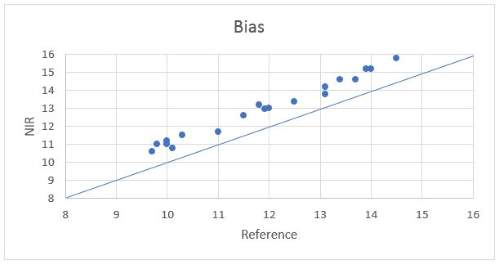
In this case the NIR instrument on average show higher results than the reference method does, and to correct this we adjust the NIR instrument. This is called to make a bias adjustment, or offset adjustment. It may also happen that your results look like in the plot below.
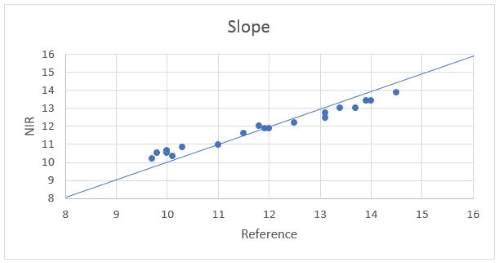
Here we see what is called a slope. It is possible to adjust the NIR instrument to compensate for this, but when we see a slope it is important to understand the reason for it and we recommend that you contact your NIR application specialist for further investigation. Don’t make slope adjustments unless you have training and experience.
Should one or several samples differ by much more than the rest of the samples do, you need to investigate the reason for this carefully. It may be as simple as a sample ID having been mixed up, or it may be that some mistake was made when analyzing the sample by either NIR or reference method. If you have ruled out those explanations, please contact your NIR application specialist for further investigation.